Wednesday, December 12, 2012

Mrs. Parker reporting for duty!

***Calvin's Hats Donation Update! The $28.20 that we raised last month has been donated today! Thank you so much to all of you for your support. You guys make my heart soar!***


Welp, I did it! I got married to my soulmate and I have to tell you, I've never been happier in my whole life. It seems surreal and at the same time, not a lot has changed. :)

We're not having a honeymoon but it feels like we've fallen in love all over again like it was the first time. I'm just thrilled to the bone to be with my husband and share the rest of my life with him. This week has been eventful to say the least.

First and foremost, the wedding was just great. It was really small and quiet but with my anxiety being what it is, that was pretty much ideal. I was hanging onto walls and shaking like a leaf walking through the crowd of people at the security stop in the courthouse entrance. The ceremony waiting room was small and mostly empty so I had time to calm down. My guests were my sister, mother, niece, the best man, and the best man's mom. The colors were ivory and dark purple and my dress was a pretty lace vintage style dress from Sealed With A Kiss. I only have one picture from the ceremony so far but I wanted to share it with you guys.

Mr. and Mrs. Parker <3


In the beginning of November, George and I went through a serious hardship when I miscarried. That was the first confirmed pregnancy I've ever had and I want a baby more than anything in this world. It was really hard on both of us but in true form, we carried on loving and supporting each other through it. Hopefully this time next year we will be ready to try again.

George has decided to join the Army National Guard and we are waiting on one more test and physical to find out when he can go to boot camp. I'm nervous about him being gone for so long because I am insanely co-dependent on him. I don't feel like me without him around but I know I can cope and he'll only be gone a few months. I'm ready for him to be able to start his career and I know he is too so that's a good thing. 

The thing I'm looking forward to now is getting this weight off. I've worked hard to be healthy for many years now and my doctor was beaming at my lab results. "You could not be any healthier than you are now," she said beaming at me. I beamed right back! :)

The amount of weight on my body does present some other health issues that I'm eager to get rid of like ovarian cysts and severe sleep apnea. I have decided to take a huge step in my road to a healthier body and my doctor has agreed with my decision whole heartedly. I don't want to say what steps I'm taking until I know for sure which road I'll be taking but I'll keep you guys posted. 

Firstly, I have to go in for another sleep study to get fitted for a sleep apnea mask and breathing machine tomorrow night. I'm beside myself thinking of what a good nights sleep is going to feel like. It's been years and lately I can't get more than a couple of hours in before I wake up choking and aching so I'm ready for this change to happen sooner rather than later. 

I hope that if you are reading this and you have medical issues that sometimes worry you, you take any necessary steps to get better. All my life I've been the kind of person to blow things out of proportion in my mind. A head ache turns into me thinking I have a tumor in my brain, a rash turns into me thinking I have lime disease and so on. You would think with all that worrying that I would be at the doctor's constantly checking that I'm going to be ok but instead I would avoid the doctors like the plague and just worry myself sick about my ailments. 

I'm very lucky that I never got seriously ill but I don't want you to wait until 30 to realize that its better to start taking care of yourself from as early on as possible. It's true that no one is going to take care of you but you, but it's also true that no one can take care of you better, so hop to it. :)

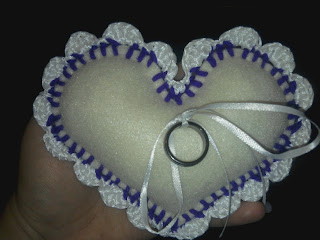
That's all I have for you this post but here are some pics of the things I DIY-ed for the wedding. :)


Thanks for reading!
Love,
Mery Ann 


Monday, December 3, 2012

And the winner is...

The November charity event to benefit Calvin's Hats was a great success friends!

If you didn't already know, for the entire month of November, I set up a scoodie giveaway in return for earning some charity money for one of my favorite organizations. Calvin's Hats donates tiny micro-preemie hats to babies born way to early to survive on their own.

We were able to raise $28.20 to be donated online to www. CalvinsHats.com. I'm hoping to be able to include a little more than that from my personal funds but I have to wait until the 12th to know if I can. I'll keep you guys posted. :)

The winner picked by random.org is NICHOLAS CATANESE!

Please email me at CoolBeansandThings@yahoo.com to claim your prize. You have until December 5th to claim your prize. 

***If this prize isn't claimed by the 5th, a new winner will be drawn***

Please let me know the style/color you want for the scoodie. Here is a look at the one I have already created:


Monday, December 10th is my wedding day. I've been so busy that I haven't been around to blog much. I'm doing a lot of things on my own, my nails, makeup, alterations to the dress and groom's suit, decorations, and organizing everything so its been hectic. Right now the wedding will have about 9 people present including the bride and groom. Afterwards we're taking pictures at Lake Eola park nearby and rounding the day off with an early dinner at Golden Corral. 

It's not the most high class, expensive wedding ever but that doesn't matter to me. If it weren't for my friend Luis who donated most of the money for the wedding, it wouldn't even be really happening, so I'm feeling lucky nonetheless. 

This is me and my fiance :)


He pretty much saved my life. I didn't have too much to look forward to until he came into my life. It may sound corny or crazy but I feel like his true love's kiss broke the curse of my bad luck life. <3

If you want to get us a wedding gift, we made a registry at target.com and most of the items are either on sale or already low priced. :)


Thank you for reading!
Love,
Mery Ann


Thursday, November 1, 2012

It's for a GREAT Cause!

Hello Friends and welcome to my very first Blog Giveaway! I wanted to make it extra special so I'm doing this one in honor of Calvin's Hats Charity!

Calvin's Hats is a non-profit organization with a mission to provide hand made hats for babies who are born too early to survive. My niece was born too soon and she was only 1 pound at birth. We were fortunate in that she continued her fight for survival and now, 11 years later, she is a happy and healthy little girl. I can never forget the anguish and fear we all went through as a family, praying that she would get better. I know every little bit of love and compassion counts in those times of need and seeing people come together to do something as small as providing a warm hat for a tiny baby can make a big difference. I normally crochet tiny hats and mail them in but I really wanted to do more and I know that the more people know about it, the more they will want to help. 

Here are the links to Calvin's Hats on facebook and their official website:

Facebook.com/Calvin's Hats
Calvin's Hats Official Website

With that in mind I am running this blog giveaway and also raising money on my online shop this entire month to benefit Calvin's Hats charity! Now let's get into the details!

Here is the Prize: 

One lucky winner will be the proud owner of a handmade Cool Beans and Things Bear Scoodie. A scoodie is a scarf with a hood attached! I crochet them with adorable bear ears and pockets for your handsies at the ends of the scarf!The colors of the Scoodie may vary. It is one size fits all.  :)


How to Enter: 

Each person can have a MAXIMUM of 16 entries into this contest!


  1. You gain 1 entry for commenting below. 
  2. If you share a status about this giveaway with a link to the Cool Beans and Things facebook page and/or blog, that is worth 2 entries!
  3.  If you have a blog of your own and you post about this giveaway with a link back to it, that is worth 3 entries! 
  4. Finally, if you make a donation to Calvin's Hats charity you will get a whopping 10 entries!! There are three ways to donate:


MOST IMPORTANT PARTS BELOW, PLEASE READ CAREFULLY AS I DO NOT WANT TO DISQUALIFY ANYONE.

Eligibility and Shipping: 

If you are under 18, please have your parents consent to enter this giveaway as the prize will be mailed to the winner and your address will be required. Please note that this giveaway is open WORLDWIDE but International winners may need to wait up to 6 weeks for shipping as each country has different customs rules on shipping. Continental U.S. shipping will be via U.S.P.S Ground. Shipping and Handling will be covered and this giveaway does not have any cost to the participants. No purchase is necessary to win. Please note that this prize is non-transferable.

Giveaway Dates and Details:

The last day to enter will be December 1st, 2012 and the winner will be chosen via Randomizer.com on Monday, December 3rd. 

The winner will be posted on this blog and it will be completely up to them to contact me via email to claim their prize. If by December 5th, the first chosen winner has not contacted me back, a new winner will be chosen. 

To make sure you don't miss out, be sure to subscribe to my blog via email so that you can get notified when the winner is chosen.

That's all for now folks, let's start the season of giving off with a BANG!

Thanks for reading.
Love,
Mery Ann/La Lady Panda


Thursday, October 25, 2012

Makeupbee.com Halloween Competition!

I guess I never mentioned this to you guys before but I love love love make up!

I don't wear it on a daily basis because I try to treat my skin good since I do have issues with it from time to time but I dabble in creative make up. :)

I love bright colors and dramatic looks and so I came across makeupbee.com on Pinterest and decided to try my hand on a Halloween look for a competition they're having. I haven't really messed with my make ups in a while and I am in dire need of new colors and brushes but I did the best I could with what I have.

Here's my Babydoll look :)


The competition is based on how many votes you get and anyone can vote on the site so I was hoping, if you like my look, that you guys could go vote for me too. :) Here's the link:


I might make this a more frequent thing I post about too, idk. I'm so random! Crochet, video games, and make up. HA! But that's me, and I'm not conforming to anyone's idea of who or how I should be, and neither should you. :) <3

Thanks for reading.
Geek Love,
La Lady Panda/Mery Ann

Tuesday, October 23, 2012

1.8.2 is FINALLY HERE!

So many new things are happening in my world lately, I can hardly keep up! I'm really sorry I haven't been blogging as much but I will definitely be making up for lost time. :)

I'm super proud and excited to tell you guys that I am now the Gaming Correspondent and newest cohost to the blog talk radio station, The Geek Supremacy!

Please click this link and like us on Facebook:

The Geek Supremacy Project

We cover all things Geek! from movies, comics, tv, to video games and music so definitely check us out. :) We've been discussing doing a vlog or video podcast as well and although I'm nervous as all hell about it, I'm leaning towards yes.

I know I'll get a lot of flack from some viewers for being a big girl but I don't think I'll let it get to me. I recently came across a tv show and magazine about plus sized (actual plus sized not that 'real size' bullshit the mainstream media want us to swallow) models and I think if I weren't so short, or agoraphobic, I'd seriously consider trying out some modeling. Holy shit balls, just thinking about that makes me anxious. SHEESH! Moving on!

In crochet news, I have been designing some super geek chic apparel for our noggins. From Skyrim Iron Helm hats to super hero beanies! Get ready to gear up geek style soon! If you can't wait for me to stumble upon the hat you want, be sure to request a custom made hat for yourself on my etsy shop. It's easy! You click it, send me a note of what you want and I create it for you! Prices are discussed and paid for up front and the turn around time is usually 7-10 business days but I can usually do it in less time.

Click the link below and then Request Custom Item on the bottom left hand side menu:

Cool Beans and Things Etsy Shop


Most of us are eagerly awaiting the release of some huge games this year such as Assassin's Creed III, Halo 4, and Black Ops 2 and the wait is getting shorter folks. I want to give you guys a heads up on an all new FREE TO PLAY (yes, FREE!) game on Xbox Live.

The new and improved dashboard came with some impressive add ons such as Internet Explorer and all new Xbox Music, but a little known new program came along for the ride where free to play games will also be supported by Xbox Live. The first of many, Happy Wars is a super fun 15 on 15 multiplayer game where tiny little warriors battle it out to destroy the other teams castle. You can choose from a warrior, cleric, and mage class and level your character items with stars won in the game or tickets purchased with Microsoft points. 


If you haven't check it out yet my friends, give it a try. There are set times Bonus Time during the day where you get bonus XP and games can be harder to find but there is also a co-op and campaign mode. What better way could there be to 'kill' time then to play a new and free game? Go check it out! 


Now for some Minecraft news: First of all I wanted to showcase some of my newest Minecraft creations with you guys. Since the 1.8.2 update hit Xbox we now have CREATIVE MODE and UGH! Where have you been all my life? As if flying around and running super fast aren't awesome enough, the creative mode menu is a miracle and so easy to use!

My one and only gripe is that the water and lava buckets don't automatically refill and there's no shortcut to delete something from your hot bar. Some people opt to make a lava pit garbage disposal nearby or select the item in the menu then back out to make it disappear. There should be an easier way to do that though.

Now, everyone knows that Pandaland was a huge endeavor for my friends and I and there was a lot of compliments and criticism for it from the gaming community. This time around, I'm really spreading my creative juices allll over Minecraft's face!

I decided to do not one, but 4 parks in an all new, super huge PANDA WORLD! So far we've done the main entrance, a candy shop, a souvenir shop, the 4 park entrances, and 3 rides for the Water Park (still needs to be named). I am showing these pics to my blog readers EXCLUSIVELY!


 TAH DAH! The Main Entrance. It even has ticket booths!

 Here is the Candy Shop in a Cupcake Building! Those are sliding glass doors beside the cake display case!

The souvenir shop is a giant fish bowl! Inside you'll see nemo 'hangin' around :D Can you see some familiar faces? shhhhhhhh don't say anything! lol


Once you're inside the Water Park, You see this awesome Pirate Ship! Climb aboard with your friends to play a fun round of bumber boats. Break each other's boats and be the last one standing to win! The canon's are dispensers that launch chicken eggs!


Right next door is Winter Wonderland where you can practice your speed skating.

A little further into the Water Park you'll see a pyramid welcoming you to The Nile Lazy River where this gold toothed croc and his palm tree buddies show you a cool time. :)

I want to give a special thank you to my collaborators and awesome friends, Stacey/Sp0nG3BOoB, Josh/K1NG PWNAGE 98, SpartanMacky, Abel/BeastnessisLife, Az/PoP KoRN Xio, Luis/Sneaky Diablo, and Chynna/ DynamicWhisper3. If I missed someone, please forgive me...I'm on this map all day every day and it becomes quite transient. People come and go so often, it's hard to keep track.

In the same breath, I want to thank you all for putting up with my tyrant ways, lol. We all know, if its not perfect, Lady will tear it ALL down and either do it all myself or ask you to change it. I love you all for putting up with my OCD lol. <3

Welp, that's all for now (it was a LOT, I know lol). Tune in for my pre-release review later this week for the upcoming big game release season!

Thanks for reading.
Geek Love,
La Lady Panda

Friday, October 12, 2012

It's Here! It's Here!

FINALLY! I have some of my creations being showcased by my gaming community on our very own Youtube channel!

So far we're recording my oldest and first creations but it's so fun to see it up online. Soon we'll be recording some tutorials and even my cool piston and redstone creations. I can't wait! AHHHH

In the meantime, please check these two out and don't forget to Like, Comment, and Subscribe for more creations from yours truly, La Lady Panda.

The first video is of Pandaland. It is a fully functioning theme park. :)


http://www.youtube.com/watch?v=_APdr-Gd4os&list=UUswoTPHl5xZZhnhOoMe8j1A&index=3&feature=plcp

The second is Creeper Manor Hotel and Resort. :)


http://www.youtube.com/watch?v=EICQwr2Bbbs&list=UUswoTPHl5xZZhnhOoMe8j1A&index=1&feature=plcp

Thanks for reading/watching.
Love,
Mery Ann

Sunday, October 7, 2012

Dinner for two?

I'm impatiently waiting for the 1.8.2 update to the Xbox 360 to finally arrive! I've been playing less but amping myself up to spend tons of time playing once the update comes out. 

If you love Minecraft as much as I do, check out the 1.8.2 update Celebration Sale on my etsy shop. 20% off on all Minecraft gear! 


In my desperation I decided to revisit some of my old creations. Ah how the time has changed me and my crafting ways lol. I make much bigger and piston-y creations now but when there were no pistons, I dedicated every ounce of creativity into the look of my structures. After Pandaland, I wanted to create a city. I succeeded in the construction of the city to about 90% of its potential. It's got schools, post office, hospital, church, fire department, bank, auditorium, botanical garden, community pool, hot air balloon, mall, movie theaters, gas station, restaurants and more!

I wanted to share some of these creations bit by bit (heehee bit) so I decided to throw in some pictures of some of the restaurants in my city.

Here's my favorite, the Krusty Krab!


I tried to make the inside as accurate as possible. Sorry about the poor quality of the photos. This was  before the lighting fix was applied. The menu is just like in the show. I included Mr. Krabs office, the kitchen, the walking freezer, the tables, the register, and SpongeBob's grill(furnace). :)


Another restaurant I made was near the high school, it's a McDonalds! It has a lobby area, counter with registers, and a drive thru! Menu and all :)


This is the Yumm Yumm Tepanyaki Palace! I had to put a layer of water in the ground floor so that the grill/tables which have glass covering a lava bottom wouldn't set the place ablaze. It took me 4 hours and 10 huge blazing fires to figure that one out. I'd be on the second floor building where a familiar sizzle would run through and ruin everything. It was frustrating lol but worth the hard work. 


I hope you like some of my restaurants. I have tons of other builds that I can show you on xbox if you send me a message to La Lady Panda gamertag. Keep an eye out on my blog too, I'll be updating more Minecraft build pics. I hope to have a PVR or PVR connect to be able to record my creations to upload here and youtube soon. Comment on here if you'd like me to visit some of your maps and check out what you have built. I would love to showcase it for you on my blog also. :)

Thanks for reading.
Love,
Mery Ann


Thursday, September 20, 2012

Free Doll Pattern!

My niece is turning 11 on Monday and for weeks I thought about the right gift, the best gift. I made her some butterfly hair clips (let me know if you want the pattern for these) and some ballet style slippers which I posted in the previous blog post.

At first, I thought she might not want a doll or would out grow it soon but I couldn't shake the thought that I wanted to make one for her anyway, so I did!

I found this fantastic pattern online through Pinterest.com and made some additions. It is expertly written and easy to follow so I didn't have to make any alterations. I have copied the basics below but i highly recommend going to her site on Craftster.com as she has some other amazing things to add on to the doll (the teddy bear and kitty are my favorite!).

Here is the link to the original pattern and creator:

http://www.craftster.org/forum/index.php?action=profile;u=174226;sa=showTopics;start=10

Here are some pictures of the doll I made for my niece with attention to the details like the jewelry and butterfly hair clip. :)


Materials:

- Yarn in various colors of your choice.
- Embroidery floss or yarn for the face.
- Sewing thread that matches the color of the yarn for the hair.
- A hook appropriate to the weight of the yarn. I personally used fingering weight yarn and
 a 2.0 mm hook, which resulted in a 8.5 inch doll.
- Yarn needle.
- Polyfill.

Note: When switching colors, the last loop you pull through the stitch before the switch 
already has to be in the new color.

Basic doll instructions

Head and body

R1: Using the skin color of your choice, make 6 sc into a ring.
R2: sc inc in next st, around (12)
R3: sc inc in next st, sc in next st, around (18)
R4: sc inc in next st, sc in next 2 st, around (24)
R5: sc inc in next st, sc in next 3 st, around (30)
R6: Work even (30)
R7: sc inc in next st, sc in next 4 st, around (36)
R8-R12: Work even (36)
R13: sc next 2 tog, sc in next 4 st, around (30)
R14: Work even (30)
R15: sc next 2 tog, sc in next 3 st, around (24)
R16: sc next 2 tog, sc in next 2 st, around (18) Stuff the head firmly. Change to the body
 color of your choice.
R17: Work even (18)
R18: sc inc in next st, sc in next 5 st, around (21)
R19-R25: Work even (21)
R26: sc next 2 tog, sc in next 5 st, around (18) Stuff firmly.
R27: sc next 2 tog, sc in next st, around (12) Stuff more.
R28: sc next 2 tog, around (6) Fasten off and weave in the end. Embroider a face 
according to your own taste, or look at the pictures for inspiration.

Legs

R1: Using the leg color of your choice, make 6 sc into a ring.
R2: sc inc in next st, around (12)
R3-R5: Work even (12)
R6: sc next 2 tog, sc in next 10 st (11)
R7: Work even (11)
R8: sc in next 5 st, sc next 2 tog, sc in next 4 st (10)
R9: Work even (10)
R10: sc in next 3 st, sc next 2 tog, sc in next 5 st (9)
R11: Work even (9)
R12: sc in next 7 st, sc next 2 tog 
R13: Work even 1 sc in each st around
R14: sc in next 2 st, sc next 2 tog, sc in next 4 st (7)
R15: Work even (7) Stuff the lower leg firmly at the bottom, and more lightly 
towards the top. The rest of the leg will be so thin, it doesn't need stuffing.
R16: sc in next 4 st, sc next 2 tog, sc in next st (6)
R17-R44: Work even (6). Fasten off, leaving a yarn tail for sewing. Make another leg, 
then sew both to the body.

Arms

R1: Using the skin color of your choice, make 6 sc into a ring.
R2: sc inc in next st, sc in next 2 st, around 

R3-R5: Work even  1 sc in each st around

R6: sc next 2 tog, sc in next 6 st (7)
R7: Work even (7) If neccessary, put a small amount of stuffing in the hand. The rest
 of the arm will be so thin, it doesn't need stuffing.
R8: sc in next 2 st, sc next 2 tog, sc in next 3 st (6)
R9-R22: Work even (6) Fasten off, leaving a yarn tail for sewing. Make another arm, 
then sew both to the body.


I really hope you like the pattern as much as I do. I think the author/creator's name on there is Wayuki.

Thanks for reading.
Love,
Mery Ann

Thursday, September 13, 2012

Ballet Slipper/Heart Patterns

Hey friends!

My niece is turning 11 in less than two weeks and I wanted to make her gift something really special. I looked around for free patterns for slippers and found a great one on youtube.

Here's the link:
http://www.youtube.com/watch?v=x5SBXwDPh8I&feature=relmfu

I love the chunky style and ribbon idea so I used that in a ballet slipper style and added some flare in all of my niece's favorite colors. Here is the pattern with my alterations to it. 

(All credit for the basis of the pattern goes to originator of the youtube.com video listed above. Her version of the pattern can be found on etsy.com as well.)


Hook: K/Size 10.5/6.5 MM

Use two strands of yarn from either one skein of color or two. I used two in hot pink for mine.

Tools: 
Yarn Needle
Ribbon (at least long enough to tie around the ankle)

Stitches:
SC- Single Crochet
SLST- Slip Stitch

With both strands at the same time, Chain 2.

- 9 SC in 1st chain. SLST into first chain. Chain 1 and Turn.

- 2SC in every stitch around (18 STs total)  SLST into first chain. Chain 1 and Turn.

(If you require a wider slipper, add another increase row as follows:

1SC in 1st stitch, 1SC in next stitch, 2 SC in next stitch, repeat all the way to the end.  SLST into first chain. Chain 1 and Turn. Should be 24 stitches around)

- *1SC in every stitch around then SLST into first chain. Chain 1 and Turn.*

*Repeat until the front of the slipper reaches the start of your toes (Usually 4-6 rounds)

From here until the end you will be crocheting rows but not all the way around. 

-*1SC in the next 10 stitches (you may want to increased this to 12 stitches if you want your slipper to cover more of your foot. If using the wider stitches you may need to increase this to 16 SC) then SLST into first chain. Chain 1 and Turn.*

*Repeat until the length of the slipper reaches the back of the heel. 

-Fold the slipper in half at the heel end. SLST the two halves together, tie off, and weave in ends.

At this point you may use your ribbon, woven around the edges of the slipper at the opening to create the ballet style. 

I added some stitched hearts for added adorableness! Here is a small heart pattern:

Hook: G/4.5MM

Stitches:
SC- Single Crochet
HDC- Half Double Crochet
DC- Double Crochet
SLST- Slip Stitch


Chain 4, Join with a SLST at first chain to create a loop. Chain 1


-In loop: 1HDC, 1DC, 1HDC, SLST, 1HDC, 1DC, 1HDC, 3SC, 1DC, 3SC then SLST into first chain. Tie off and leave at least a 6 inch tail for sowing.

It should look like this! I stitch it tight so the shape stands out more. :)


That's all for now friends. I hope you like the free patterns and you have a blast making your ballet slippers!

Thanks for reading.
Love,
Mery Ann

Thursday, September 6, 2012

FUZZ be gone!

I'm a t-shirt maniac. If I could wear a t-shirt for every occasion, I would and believe me, I try to. The saddest days are when my favorite shirts loose they're new shirt gleam and begin to look old. I've noticed that the worn look can sometimes be a result of bad lint, or fuzz.

In the past I've used electric lint removers for t-shirts and sweaters but I hated how the shaver sometimes pulled up strands and created nicks in my fabric, so I gave that up.

Yesterday I was in the bathroom, waiting for my face mask to dry up so that I could wash it up and I saw my boyfriends collection of cheap razors (which he uses once, and then instead of discarding, leaves them on the sink). I looked down at my t-shirt nighty and thought, hmm why not?

I shaved off the fuzz and was amazed at the newness bouncing back at me from my fabric! I figured I had to share this with you guys.


I'm rushing to the nearest dollar store on my next payday to stock up and refresh my favorite threads. Be careful when you're shaving your clothes and what materials you are using the shaver on so that you don't get any nicks or snags. Try using a fresh razor and no water as that seems to work best and good luck friends!

Thanks for reading!
Love,
Mery Ann

Saturday, September 1, 2012

Crocheting Curves

I love to crochet but I can honestly say that even I get tired of row after row of the same stitches. For that reason, and the fact that my hands get sore fast, I tend to stick to small projects. I'm not a great finisher either and lack of motivation runs rampant around the time I get half way through big projects. I tend to stick to really small crochet ideas so as to finish them quickly and reap the rewards of almost instant gratification.

Someday I'm hoping to work my way up to a full size afghan, or dare I say, plus size tunics! lol Well, when I do get there, I can rest easy that this amazing book I found online will be there to expertly guide me through what will probably feel like millions of stitches to the glorious finish line.

The article I found thanks to twitter about this book graciously provided a link for a free tank top/vest pattern too!

Click here for the free pattern: http://www.crochettoday.com/files/patterns-pdf/CurvyGirl.pdf


It's also available on nooks and kindles. I don't have one of those but I do have an iphone and you can get the kindle app on there for free and then download the book (not for free lol). 

I know its been a while since I posted but I've been going through hell and high water trying to get health insurance and get my car fixed so that I can go back to therapy and work on my agoraphobia. I feel like every step forward is ten steps backwards but I know thats a universal feeling too. I hope you guys like this free pattern and book suggestion. :)

Thanks for reading.
Love, 
Mery Ann

Wednesday, August 15, 2012

DIY Crochet Patterns

Today has been a long and productive day for me. I went to the mechanic and got a lovely bill exceeding $550.00 to fix my grinding brakes and calipers. I went to the grocery story and spent more than $250 in groceries. I called my insurance company to get it reinstated which should be another lovely monthly bill and doctor and hospital copayments. Needless to say, keeping up with the cost of living can be daunting and every little bit helps.

Since I've learned to crochet I have been making a lot of varied crocheted projects but it didn't hit me how much it could help around the house. I found some awesome patterns for household items on Pinterest and Ravelry and I would love to share them with you.

Loofa's aren't exactly expensive but it can be very annoying if the cheap store bought ones keep unraveling and breaking apart for you. Here's the answer! This pattern is not my own creation, the original creator and her awesome blog can be found here:
http://virkning-crochet.blogspot.com/2011/05/duschboll-i-bambu.html


Bath puff

Yarn: Bamboo Soft, 100m/50g, from Ullcentrum
Hook: 3½ - 4mm (crochet loosely)

Ch 5 sl st in first ch to make ring
Rnd 1: ch 3 (counts as dc), 14dc in ring, join with sl st in top of beg ch-3 = 15dc
Rnd 2: ch 3 (counts as dc), 4dc in same st as joining, *5dc in next dc*, repeat, join with sl st in top of beg ch-3 = 75 dc
Rnd 3: ch 3 (counts as dc), 2dc in same st as joining, *3dc in next dc*, repeat, join with sl st in top of beg ch-3 = 225 dc
Rnd 4: ch 3 (counts as dc), 2dc in same st as joining, *3dc in next dc*, repeat, join with sl st in top of beg ch-3 = 675 dc

Fasten off. Make a twist of the remaining yarn. The finished product is about 10cm in diameter.


I loved Swiffer products when they first came out on the market, then after some time, the refill cost piled up. If like me, you're ready to upgrade to a more permanent and less costly solution, why not crochet dusters and mops? I found this pattern on ravelry.com. Check out this Swiffer Duster by Krysten L. & Gherkin’s Bucket :


copyright Krysten L. & Gherkin’s Bucket 2007. Don't steal my stuff y'all. It's for personal use only, to bring joy to others.
Give credit where credit is due. Selling the finished product for non-profit charity uses is OK.


Materials
Size H (US 8) crochet hook 1⁄4 oz worsted weight kitchen cotton (I used Sugar n Cream) 1 1⁄4 oz machine-washable novelty yarn (dependent upon type ~35 yards)
Abbreviations
Ch – chain Sc – single crochet Ea – each Dc – double crochet Tfl – through the front loops Hdc – half double crochet Sl st – slip stitch St - stitch Rep - repeat
Pattern
Ch 21 Sc in 2nd ch from hook, sc in ea ch across, turn (20 sc)
Create Round: Ch2,*dctfloffirst5sc,hdctflinnext10sc,dctflinlastfivesc,ch2*,turnwork and rep from * to * working in remaining loops from the row of sc you just worked into (i.e., what was the back loop of each stitch), join with sl st to first dc of the round
Close Round: ch 1, sc tbl of both sides of previous round all the way across (this will create a pocket, and leave a ridge to attach the novelty yarn to later), turn (20 sc)
Repeat last two lines once more, fasten off and weave in ends.
Attach novelty yarn to one loop of an edge stitch on the long side with a sl st, ch 10 loosely, sl st into loop of next st. (SEE NOTE BELOW)
* Sl st in loop of next stitch, ch 10 loosely, sl st in loop of next st *, rep from * to * across.
At the end of the row, ch 2 and turn, continue back in the same manner through the “ridge” of loops you created when you closed the round. Repeat for 2nd ridge and the other side edge; you will have four ridges of novelty yarn loops. Fasten off and weave in ends.
Slip prongs of Swiffer Duster into the two pockets and get dusting! Note that the first time you put it on it will be snug and may require some “scooching” to get the handle prongs all the way in.
NOTE – Use my directions for the fringe as a guide, if you have particularly bulky novelty, you may need to adjust these directions. Try making your chain length a little longer and slip stitching into every other loop, etc. It all just depends on how loose or compact you want the dusty part to be: looser and longer fringe will allow for more corner and small places dusting; compact and shorter fringe will make for a more “scrubby” duster.
You can also purchase these pre-made through my etsy shop, for those of you who are less than crochet-inclined. www.gherkinsbucket.etsy.com

For this Reversible Swiffer mop, please click this link:


Last but not least is all cotton scrub pad's for washing your face and removing make up:

http://barbarabradford.blogspot.com/2009/01/butterfly-facial-scrubbie-gift-set.html


I'm going to keep searching for more ways to put my skills to the test and I'll be sure to share my findings with you, my friends.

Thanks for reading.
Love,
Mery Ann

Thursday, August 9, 2012

Mod Podge Wonders!


I don't know about you guys, but I'm a Pinterest fanatic. The funny thing is, I'm pretty damn lazy...and usually strapped for bucks so as much as I want to DIY the crap out of everything, I never actually get around to creating those awesome crafts. I first heard about Mod Podge when I started pinning and pretty much every one kept saying how expensive it was. In some cases it can be up to 8 dollars a bottle. I don't know about you but eight bucks is a lot at my house. 


When I saw all the cool things you can do with it, I really wanted to try it. I'm especially interested in the yarn related crafts that float around Pinterest. As a result, I went on a search for the makings of this wondrous device. As it turns out, it's a lot simpler than I thought it would be. I wanted to share it with you, so here's the recipe:

Mod Podge in a Pint Jar (matte)

Fill jar half way up with white glue (like Elmers)
Then fill jar up with water.
Shake Well.

This is a 50-50 mixture glue/water.

It will have a Matte finish.
If you would like a Glossy finish, add 1 TBS of clear varnish.
Shake it!

Now that you know how to make it, check out this amazing blog on how to use Mod Podge for fun crafty projects 


That's all for now friends but let me know if you liked this info and share any and all crafts you make from it. I'd love to see what you come up with. :)

Thanks for reading.
Love,
Mery Ann

Friday, August 3, 2012

Is anybody out there?

I've been working on this blog for a few weeks now and I don't think I've put enough of myself in it. I am by nature, a writer. My thoughts are driven by analogies, my visions are riddled with adjectives, my words are flourished with verbal scenery. Every time I witness something new or awe inspiring, in my brain I'm working out the most polished and interesting way of describing it, mostly to myself and often to whomever is nearest. 


My closest friends and family know me as, well, a know-it-all. I don't mean that in a negative way mostly but it can have a connotation to it that can sometimes sound distasteful. I take it as a compliment. 


I love teaching. As long as I can remember, I have always wanted to be a teacher. One year, after the last day in my fourth grade class, my teacher let me take home the most worn text books to keep. I spent the entire summer playing 'school'. I would set up my bedroom floor as a classroom with teddy bears and baby dolls as students and my poor six year old brother as the only mobile pupil. I would prop up a composition notebook on the frame of my red metal bunk bed and try my best to pretend it was a black board. I taught my 'students' about our solar system, addition, and read to them my favorite Judy Bloom books. We had lunch with pudding snacks and nap time where my brother would run off to play something else usually. 


He was always a good student. I taught him his ABC's on a metal white board with colored plastic magnets. I even remember as a 6 year old being on all fours next to him as he lunged back and forth trying to imitate my crawling. 


Those are some of my fondest memories of my little brother. He taught me just as much as I taught him. His patience and unconditional love have always been a priceless lesson for me. 


If you are out there, and you are reading this, I promise to put a little more of myself in here. I'm an open book and if I do say so myself, it should be interesting to read.


Thanks for reading.
Love,
Mery Ann